- rmauro.dev — Technical Blog/
- Posts/
- Getting Started with Chat GPT integration in a .NET C# Console Application/
Getting Started with Chat GPT integration in a .NET C# Console Application
Table of Contents
With the use of C#, we can develop a console application that uses the Chat GPT model to generate human-like responses to input.
In this blog post, we will explore the steps to develop a console application using OpenAI’s Chat GPT model using C#.
OpenAI is a leading organization in the field of artificial intelligence, and one of its popular AI models is the Chat GPT (Generative Pretrained Transformer).
💬 What are OpenAI and Chat GPT? #
OpenAI is a prominent organization that develops AI for various applications, including natural language processing. One of their popular AI models is the Chat GPT, a generative language model that uses a transformer architecture to process input text and generate human-like responses. It’s commonly used for chatbots and other natural language processing tasks.
🧵 Development with source code #
To develop a console application using OpenAI’s Chat GPT model in C#, we will follow these steps:
Step 1: Install Standard.AI.OpenAI C# library #
To use the Chat GPT model in C#, we will need to install the Standard.AI.OpenAI C# library. We can install the library using the following command:
dotnet add Standard.AI.OpenAI
Step 2: Create an OpenAI account #
To use the OpenAI API, we need to create an account on the OpenAI platform. The registration process is straightforward and can be completed in a few minutes.
- We just need to visit the OpenAI website at https://platform.openai.com/overview.
- Then click on the “Sign Up” button in the top right corner.
- Click on the button to start the registration process.
Note that OpenAI’s API is currently in beta, and access to the API may be limited. Additionally, OpenAI charges for API usage, so it’s essential to keep track of usage and billing to avoid any unexpected charges.
If you are getting started they usually give starting amount of dollars as credits without the need of a credit card.
Step 3: Create the class OpenAIProxy #
Within this class, we’ll encapsulate the logic to access OpenAI APIs.
Let’s define our interface first.
using Standard.AI.OpenAI.Models.Services.Foundations.ChatCompletions;

namespace ConsoleAppOpenAI;

public interface IOpenAIProxy
{
  Task<ChatCompletionMessage[]> SendChatMessage(string message);
}
IOpenAIProxy.cs
That is right. We’ll expose only the method responsible for sending and receiving messages.
Step 4: Create the implementation class OpenAIProxy.cs #
Let’s jump to the implementation now.
using Standard.AI.OpenAI.Clients.OpenAIs;
using Standard.AI.OpenAI.Models.Configurations;
using Standard.AI.OpenAI.Models.Services.Foundations.ChatCompletions;

namespace ConsoleAppOpenAI;

public class OpenAIProxy : IOpenAIProxy
{
  readonly OpenAIClient openAIClient;

	//all messages in the conversation
  readonly List<ChatCompletionMessage> _messages;

  public OpenAIProxy(string apiKey, string organizationId)
  {
    //initialize the configuration with api key and sub
    var openAIConfigurations = new OpenAIConfigurations
    {
      ApiKey = apiKey,
      OrganizationId = organizationId
    };

    openAIClient = new OpenAIClient(openAIConfigurations);

    _messages = new();
  }

  void StackMessages(params ChatCompletionMessage[] message)
  {
    _messages.AddRange(message);
  }

  static ChatCompletionMessage[] ToCompletionMessage(
    ChatCompletionChoice[] choices)
    => choices.Select(x => x.Message).ToArray();

  //Public method to Send messages to OpenAI
  public Task<ChatCompletionMessage[]> SendChatMessage(string message)
  {
    var chatMsg = new ChatCompletionMessage()
    {
      Content = message,
      Role = "user"
    };
    return SendChatMessage(chatMsg);
  }

  //Where business happens
  async Task<ChatCompletionMessage[]> SendChatMessage(
    ChatCompletionMessage message)
  {
    //we should send all the messages
    //so we can give Open AI context of conversation
    StackMessages(message);

    var chatCompletion = new ChatCompletion
    {
      Request = new ChatCompletionRequest
      {
        Model = "gpt-3.5-turbo",
        Messages = _messages.ToArray(),
        Temperature = 0.2,
        MaxTokens = 800
      }
    };

    var result = await openAIClient
      .ChatCompletions
      .SendChatCompletionAsync(chatCompletion);

    var choices = result.Response.Choices;

    var messages = ToCompletionMessage(choices);

	//stack the response as well - everything is context to Open AI
    StackMessages(messages);

    return messages;
  }
}
OpenAIProxy.cs
Step 5: Set up the API key #
To access the Chat GPT model, we’ll need to set up the API key in our application. We can set up the API key using the following code:
Back to Program.cs now.
IOpenAIProxy chatOpenAI = new OpenAIProxy(
    apiKey: "YOUR-API-KEY",
    organizationId: "YOUR-ORGANIZATION-ID");
This code sets up the API key that we’ll use to access the Chat GPT model.
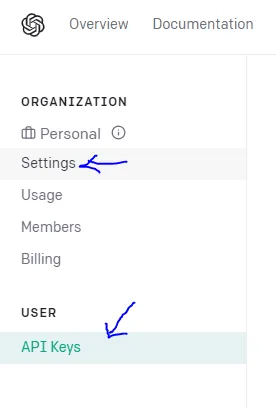
Where to get API Key and Organization ID
Step 6: Use the Chat GPT model in our application #
Once we’ve set up the API key, we can use the Chat GPT model in our application using the following code:
var msg = Console.ReadLine();

do
{
  var results = await chatOpenAI.SendChatMessage(msg);

  foreach (var item in results)
  {
    Console.WriteLine($"{item.Role}: {item.Content}");
  }

  Console.WriteLine("Next Prompt:");
  msg = Console.ReadLine();

} while (msg != "bye");
This code creates an infinite loop that prompts the user for input and generates a response using the Chat GPT model. If the user inputs “bye,” the loop will break, and the application will exit.
🎨 Final Touches #
After we get everything working we can make it a little more professional using the following packages:
- Spectre.Console ==> for better Console Output Display
- Humanizer.Core ==> give us better formatting
- Microsoft.Extensions.Configuration.Json - Read the configuration from Json files
You can check it out on the source code below the implementation.

Source code on Github
Here is the final look.

Running Application
😎 Conclusion #
In this blog post, we explored how to develop a console application using OpenAI’s Chat GPT model in C#.
We installed the Standard.AI.OpenAI C# library, set up the API key, and used the Chat GPT model to generate human-like responses to input. The Chat GPT model is powerful.
By the way. This blog post was created with the help of Chat GPT.
Don’t forget to Like, Comment, and most important--> Share It.