Create a Minimal API with .NET 6
Table of Contents
One of the new features of .NET 6 is the arrival of a new template, which will replace the default and bring a good reduction in code writing. Including the removal of the Startup.cs file.
.NET 6 was released as LTS (long-term stable) which means support for 3 years. So we have to learn about this new baby. Don’t forget the new C# 10 features as well.
Minimal APIs are architected to create HTTP APIs with minimal dependencies. They are ideal for microservices and apps that want to include only the minimum files, features, and dependencies in ASP.NET Core.
microsoft.com
💬 In this issue #
In this tutorial we’re going to create the following endpoints:
| API | Description | Request | Response |
|---|---|---|---|
| GET / | Landing Page | N/A | HTML Page |
| GET /{chunck} | Route to redirect | Chunk | HTTP Redirect to final |
| POST /urls | Create a new resource | { “url”: “https://…” } | Created Resource |
Before we get started - Dependencies #
Before getting started you need to have installed .NET6 SDK
https://dotnet.microsoft.com/en-us/download
Create the Minimal API project #
To get started let’s create our project using the new template.
Run the following code in your terminal.
dotnet new web -o URLShortnerMinimalApi
Once run and completed, open it with Visual Studio or Visual Studio Code.
You will come across only one file called Program.cs with the following content:
var builder = WebApplication.CreateBuilder(args);

var app = builder.Build();

app.MapGet("/", () => "Hello World");

app.Run();
Program.cs
This is a perfect and ready-to-run application.
Creating a Record #
C# 9 introduced a new type of data structure, called Record, which allows you to have object resources in simpler structures.
internal record class ShortUrl(string Url)
{
    public Guid Id { get; set; }

    public string? Chunck { get; set; }
}
ShortUrl Record
The ShortUrl record is defined with:
- Url it’s mandatory in his constructor and Get only property
- Id is not a mandatory property
- Chunk is not a mandatory property
The next step is to set up our database access. For that, we’ll use LiteDb - A Embedded NoSQL database for .NET.
Set up Database - Lite DB #
To make use of LiteDb we must add it NuGet package. To do so run the following command:
dotnet add package LiteDB
After including the new package let’s add it to our Dependency Injection container.
using LiteDB;

var builder = WebApplication.CreateBuilder(args);

//you could also get it from IConfiguration interface
var connectionString = "short.db";

//add as a singleton - it's a single file with a single access point
builder.Services.AddSingleton<ILiteDatabase, LiteDatabase>(
   x => new LiteDatabase(connectionString));

var app = builder.Build();

//redacted
Database access: Checked!
HTTP GET - Redirect to final Url #
Now we can use it to build our first API endpoint.
//redacted
var app = builder.Build();

app.MapGet("/", () => "Hello World!");

app.MapGet("/{chunck}", (string chunck, ILiteDatabase db) =>
    db.GetCollection<ShortUrl>().FindOne(x => x.Chunck == chunck)
    is ShortUrl url
    ? Results.Redirect(url.Url)
    : Results.NotFound());

app.Run();
Note that we’re using Pattern Matching - a new C# feature - to compare if the return is an instance of ShortUrl.
This comparison allows us to return Results.Redirect (redirect to the final destination) or Results.NotFound.
Redirect route to target Url: Checked!
Creating Chunks for a unique identifier #
To generate new chunks we’re going to use the package NanoId. We could use GUID, but it’s ugly and too big for the end-user.
Note: This library doesn’t guarantee that will be a unique generated Id every time - Let’s use it just for fun.
Add the NanoId package to our project. Run the following command.
dotnet add package NanoId
Add Package NanoId
HTTP POST - Create a new resource #
Let’s create an endpoint to create a new resource.
app.MapPost("/urls", (ShortUrl shortUrl, HttpContext ctx, ILiteDatabase db) =>
{
	//check if is a valid url
    if (Uri.TryCreate(shortUrl.Url, UriKind.RelativeOrAbsolute
       , out Uri? parsedUri))
    {
        //generates a random value
        shortUrl.Chunck = Nanoid.Nanoid.Generate(size: 9);

        //inserts new record in the database
        db.GetCollection<ShortUrl>(BsonAutoId.Guid).Insert(shortUrl);

        var rawShortUrl = $"{ctx.Request.Scheme}://{ctx.Request.Host}/{shortUrl.Chunck}";

        return Results.Ok(new { ShortUrl = rawShortUrl });
    }
    return Results.BadRequest(new { ErrorMessage = "Invalid Url" });
});
In this endpoint, the first thing we do is check if the URL sent is valid. We could use something fancier, but for sake of simplicity let’s use this simple check.
When is Good we go ahead and create a new record in the database and return an anonymous object{ ShortUrl = "Generated URL" }
When is Bad Url them we return Results.BadRequest - HTTP Status 400 - with another anonymous object with a single property called ErrorMessage and the message itself.
Route to create new Short Urls: Checked!
Adding a frontend for the end-user #
Let’s add a frontend for the user can call our APIs to generate new short-urls.
Create the folder wwwrootand a file index.html inside of it with the following content.
<!DOCTYPE html>
<html>
<head>
    <meta charset="utf-8" />
    <title>Url Shortner .NET 6</title>
    <link rel="stylesheet" href="https://unpkg.com/mvp.css" />
</head>
<body>
    <header><h1>Welcome to Url Shortner with .NET 6</h1></header>
    <main>
        <section>
            <aside style="width: 25rem;">
                <label>
                    Enter the url
                    <input type="url" id="url" style="width: 22rem; margin: 0.5rem 0" />
                </label>
                <button type="button" id="btnSubmit" style="padding: 0.5rem 1rem">Submit</button>
                <p id="urlResult"></p>
            </aside>
        </section>
    </main>
    <script>
        document.getElementById('btnSubmit')
            .addEventListener('click', e => {
                e.preventDefault();
                handleSubmitAsync();
            });

        document.getElementById('url')
            .addEventListener('keyup', function (evt) {
                if (evt.code === 'Enter') {
                    event.preventDefault();
                    handleSubmitAsync();
                }
            });

        function handleSubmitAsync() {
            const url = document.getElementById('url').value;

            const json = { 'url': url };

            const headers = { 'content-type': 'application/json' };

            fetch('/urls', { method: 'post', body: JSON.stringify(json), headers: headers })
                .then(apiResult => {
                    return new Promise(resolve => apiResult.json()
                        .then(json => resolve({ ok: apiResult.ok, status: apiResult.status, json: json }))
                    );
                })
                .then(({ json, ok, status }) => {
                    if (ok) {
                        const anchor = `<a href=${json.shortUrl} target="_blank">${json.shortUrl}</a>`;
                        document.getElementById('urlResult').innerHTML = anchor;
                    }
                    else {
                        alert(json.errorMessage);
                    }
                });
        }
    </script>
</body>
</html>
index.html
Last but not least, set up an endpoint to return the file as HTML.
app.MapGet("/", async (HttpContext ctx) =>
{
	//sets the content type as html
    ctx.Response.Headers.ContentType = new Microsoft.Extensions.Primitives.StringValues("text/html; charset=UTF-8");
    await ctx.Response.SendFileAsync("wwwroot/index.html");
});
Program.cs
Now accessing the path “/” endpoint will run this code and send the HTML to the end-user.
Note 1: It’s important to set the Content-Type as “text/html; charset=UTF-8”. Otherwise, the browser will display it as simple text (show the Html code).
Note 2: Don’t forget to delete the previous route “/” that returns “Hello World”.
Frontend to end-user: Checked!
Testing #
Run the application. The page should be displayed as follow.
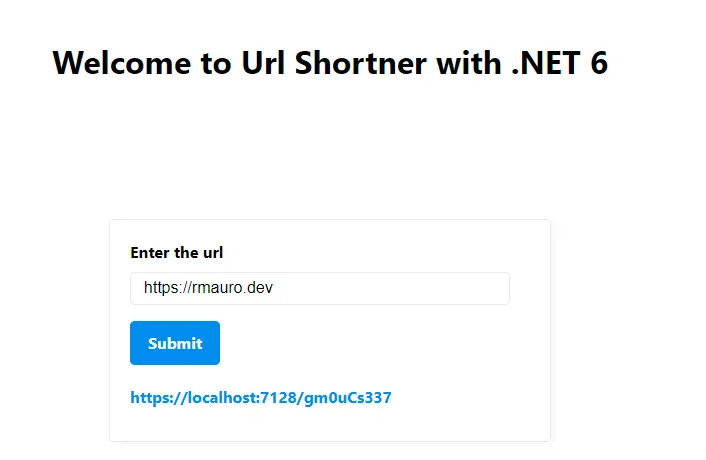
Url Shortner Landing Page
Source Code - Follow me on Github too #

❤️ Enjoy this article? #
Forward to a friend and let them know.