- rmauro.dev — Technical Blog/
- Posts/
- Create a free MongoDb Cluster in the Cloud - Mongo Atlas free account/
Create a free MongoDb Cluster in the Cloud - Mongo Atlas free account
Table of Contents
**MongoDB is a document-oriented NoSQL database used for high volume data storage. Instead of using tables and rows as in the traditional relational databases, MongoDB makes use of collections and documents.
MongoDb is very easy to get started - That is why I love MongoDb. I think it’s the best to get started as a software developer.
If you are like me - like MongoDb - or you’re just studying it. Mongo Atlas is the right choice for you - get out of infrastructure bottlenecks.
Mongo Atlas is like the Cloud for MongoDb database - Database as a Service.
Mongo Atlas is Cloud-hosted MongoDB service on AWS, Azure and Google Cloud. Deploy, operate, and scale a MongoDB database in just a few clicks
https://www.mongodb.com/cloud/atlas/lp/try2
Mongo Atlas it is free for developers and SRE like us and easy to get started.
In this tutorial let’s lean how to:
- Configure Mongo Atlas and MongoDb
- Set application username and password
- Set Mongo Atlas firewall - grant IP address access to the cluster
Configuring MongoDB in the Mongo Atlas cloud #
Let’s get started. Navigate to Mongo Atlas website (https://www.mongodb.com/cloud/atlas)
Click Try free button (top right corner) if you don’t have an account.

Mongo Atlas Home Page
Creating an account to access Mongo Atlas #
Fill in the required information requested, such as email, first name, last name and password. Accepted the terms of agreement and them click Get started free - yes, it’s free.
Activate your account with the received email (Welcome to MongoDB or something like that).
Sign In #
Log in using your credentials (username and password).
Preparing your environment - creating the cluster #
Let’s use our first cluster.
By the way, cluster is where the MongoDb databases will be stored - we can create more than one.
- Click on
Build a Cluster. - Select the free (
Starter Clusters) cluster and then clickCreate a cluster. - In Cloud Provider select
Azureand leave pre-selected region selectedVirginia (eastus2). - Leave the default value for the rest of the fields.
- Last click on
Create Clusterand wait it to finish.
The blue top bar indicates the status of the creation of the cluster. It may take a while to finish.
Important thing on the dashboard screen - What are we seeing here? #
On the left side we have menu with options to manage our cluster, such as Database Access and Network Access.
- Data Storage/Clusters - contains general information about the cluster. It’s also where we will get the ConnectionString for our application to use.
- Security/Database Access - we can manage users, passwords and permissions to access the databases.
- Security/Network Access - manage firewall rules - grant or block IP address for accessing our cluster.
These are the main options for us.
Preparing the environment for our application #
Let’s create our first database so we can start insert and reading data from it.
So far we have only the cluster, with no databases to access.
Creating the first user #
Now we should create a database user for our application to use.
Click on menu Security/Database Access and then on ADD NEW USER (right side - green button).
  Username = studenty
  Password = randompassowrd - or you can use *Autogenerate Secure Password* button
  User privileges = read and write to any database
user fields
Click Add User to create our first user.
Creating our first firewall rule #
In this section we’re going to create a rule to grant access for our IP address to access the cluster.
Click on menu Security/Network Access and then on ADD IP ADDRESS button.
On the popup window click on ADD CURRENT IP ADDRESS - this will grant access to your current IP address.
Finally click on Confirm button.
Collecting Connection String #
The connectionString contains the necessary information for a given application (C#, Python, NodeJs, C, C++, Go, etc) to access our database.
Click on Data Store/Clusters menu and then click on CONNECT.
On opened popup click on Connect your application.
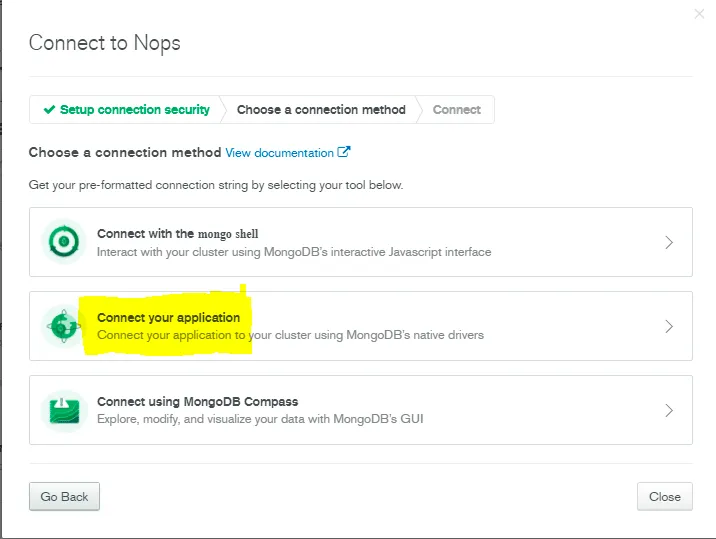
Mongo Atlas Connection Popup
Select the driver language you need and the version and them copy the connection string.
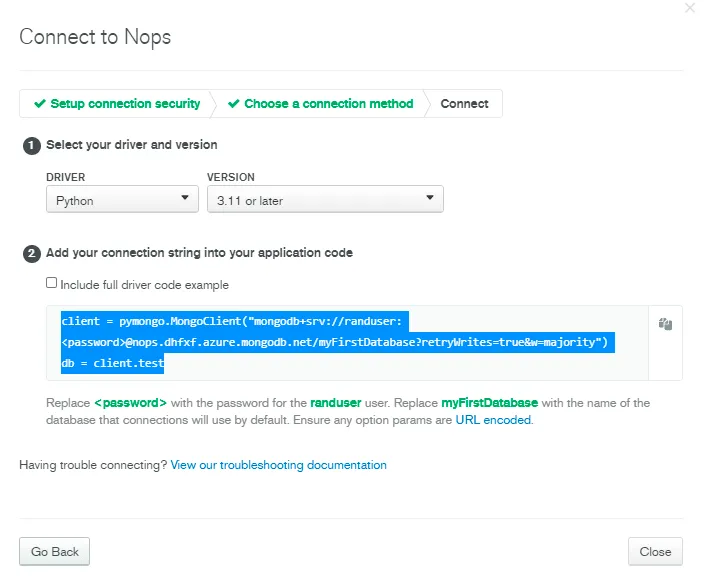
ConnectionString sample
You should get something like:
client = pymongo.MongoClient("mongodb+srv://randuser:<password>@nops.dhfxf.azure.mongodb.net/myFirstDatabase?retryWrites=true&w=majority")
db = client.test
Don’t forget to replace the password field with your actual password.
Testing #
If you docker installed, you can run the following command.
docker run -e MONGO_CONNECTION_STRING="{YOUR-CONNECTION-STRING-HERE}" -p 3000:3000 ricardomauro/node_mongo_heros:latest
docker command
Don’t forget to replace the MONGO_CONNECTION_STRING with your connection string.
This is a simple NodeJs CRUD application that connects to MongoDb.
It has the operations:
- GET http://localhost:3000/api/heros
- GET http://localhost:3000/api/heros/:id
- POST http://localhost:3000/api/heros
{
    "name": "Spider-Man",
    "description": "Marvels hero"
}
body create
Source code at: https://github.com/ricardodemauro/mongo%5Fheros%5Fapp
Sumary #
In this blog post we saw how to:
- create a Mongo Atlas account
- create a cluster
- create a database
- setup firewall rules
- setup a user and password
Hope you like it and leave a comment.